Adding wall paneling to your home adds a certain rustic charm with a modern twist. According to the latest Google Trends data, DIY wall paneling has increased in popularity. After being inspired by this trend, a manager here at BS Fixings decided to do some paneling of their own! They took pictures during their DIY journey in paneling to compliment this step-by-step guide. This guide hopes to show you that you don’t have to be experienced at DIY to install wall paneling, as it is quite easy to do with a little guidance.
Step 1: Gather your Tools & Equipment
Here are the items you will need, the majority of which we stock in store here at BS Fixings:
- A notebook and pen/pencil to sketch design, write down sizes, prep cutting list
- Tape measure
- Calculator
- MDF wood paneling - cut to size (with a cutting list)
- Spirit level
- Saw or cutter
- Mitre box
- Adhesive e.g. No More Nails Glue (or a similar brand) e.g. HB42 Ultimate Fast Grab Wood Glue
- Decorators caulk
- MDF suitable paint
- Sandpaper or an electric sander
- Hammer
- Pins
- Paint Brushes / Roller
- Fillers
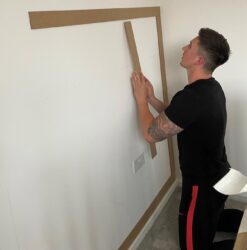
Step 2: Plan a sketch of your Paneling Design
It is important to visualise your final design before you begin, so you will need to have a clear vision of your ideas. Sketch out the design you have in mind in your notepad so that you'll stay on track and know exactly how many MDF panels you need to complete your project.
If you are lacking some inspiration, there are many completed paneling projects on Pinterest and Instagram e.g. try searching the hashtags “#wallpanelling” or “#wallpanellingideas”.
Using the sketch, you should now know how many vertical & horizontal panels you will need to complete your design.
Step 3: Measure the wall
It may sound obvious, but you need to measure the wall where you want to install your paneling. Use the tape measure to work out the full width and height of the wall. You should already know from your design how many MDF panels you will need and whether your design is for a full wall, half wall, or something more unique.
It is vital your measurements are accurate to ensure that all the panels are even. We suggest you write all the measurements down in your sketchbook and double-check them, (or even triple-check them)! Remember to account for your frame i.e. the top and base panel, as well as all the vertical and horizontal panels required. You need to take account of the width of the MDF panels for the horizontal and vertical pieces (also known as rails and stiles).
For your horizontal rails, multiply the chosen width for your pieces by the number of pieces you need for your columns. If you get stuck, your sketch should help.
Then, take that total number and subtract that from your wall’s total width. Finally, divide your new figure by how many panels you’ve decided on, this will leave you with the exact size of your wall panels and your horizontal rails!
For your vertical stiles, combine the depth of your base rail with the depth of your top rail. Then, take that total number and subtract that from your wall’s total height. This will leave you with the exact length of your vertical stiles.
Step 4: Cutting the Panels (from your cutting list)
From the sketch with your measurements and calculations, you should now be able to complete your cutting list of the panels required.
You can either cut the panels yourself or ask a professional (many MDF stockists will cut MDF wood to size). If you are cutting the panels yourself, use the saw and mitre box at a 90-degree angle to carefully cut the panels that will be horizontally placed - these need to be cut to the measurements on your sketch.
Step 5: Sanding and smoothing your wall
Next, it's time to sand and smooth down your walls, you can either use sandpaper or an electric sander if you have one to hand. Sanding and smoothing the wall gets rid of any bumps which may otherwise stop the paneling from sitting flat on the wall. Just use sandpaper and buff out the surface until smooth.
Step 6: Apply the panels to the wall
Start by applying strong adhesive to the back of the panel of which you are fitting and where it will be set on the wall, making sure to press down firmly and left to dry for an appropriate amount of time. It will be best to apply the vertical panels first, followed by the horizontal ones. Use the spirit level, to make sure that everything is completely in line for the best look possible.
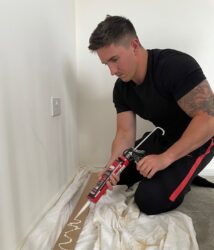
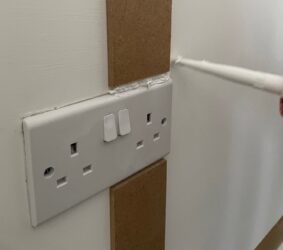
Step 7: Fill in any gaps
Once the wall panels have been applied, go over them with the caulk to patch up any unsightly gaps, holes, or cracks. You may need to fill in the sides, depending on whether any gaps have appeared (do not worry as you can cover this with paint). Once filled and dried, sand it down to complete the look.
Step 8: Paint and finish!
Now it is time for the fun part! Before you begin painting, you need to make sure that everything is fully dry and has set. If it has, get to painting and making it your own! If you want to apply another coat, it is best to leave the current coat to dry for a few hours before you put another layer of paint over the top. Once all these steps are complete, you are now free to admire your stunning new paneling work on your walls! If you followed the steps, it may look something like our manager’s below…

We hope this blog post inspired you to begin paneling some walls of your own, to add a little bit of character to your home! A good majority of the supplies needed are stocked here on the BS Fixings online store, where we can assure great quality products for your DIY paneling projects. If you would like to contact us for further information, you can get in touch with us via phone on 03330 117818 or email at [email protected].